Installation #
Thank you for purchasing the Day of Week Pro plugin. After completing the purchase, you should have received an email that contains the download details of the plugin. It is also available from your account here.
To manually install the plugin through the WordPress admin page, follow these instructions.
Setup #
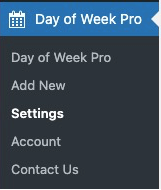
After installation the first thing that needs to happen is to set the time zone in the “Settings” page. This is needed if they set the hosting server to a different time zone than you or your customers are. Most hosting servers are set to either UTC (Universal Time Coordinated)/GMT (Greenwich Mean Time) or ET (Eastern Time).

The settings page should show you what setting they currently use on the server, and even if it is the correct time zone, we recommend setting it anyway in case the hosting provider changes it at a later date.

Cache Control (Added in v1.04) #
Some users have added cache plugins to their WordPress site or are using their hosting providers offerings. Sometimes, they don’t detect a change when the page changes. To get around this we have added an option allowing to a send a ‘no-cache’ header. When this is enabled, it will add a ‘no-cache’ header to any output, including the admin pages when you set up Day of Week Pro posts.

If you need to change this, select ‘Send No Cache Header’.
Once changed, click on “Save Settings”. That’s it.


